Rubik's Cube
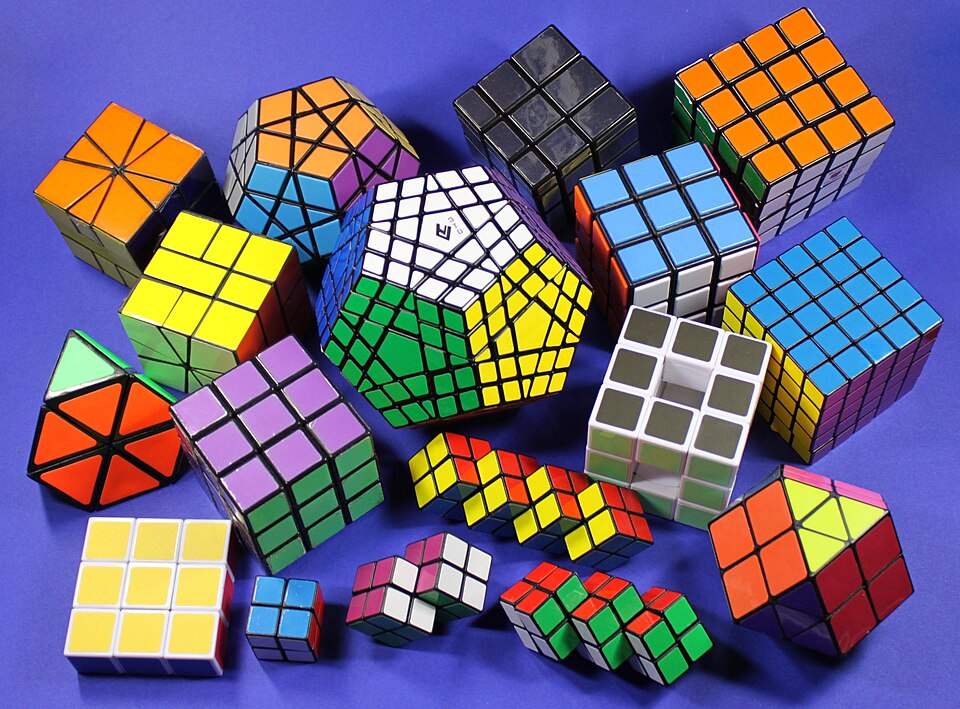

The Rubik’s Cube is a three-dimensional puzzle cube as well as the world’s best-selling toy of all time, with over 300 million sold. It was invented in 1974 by Hungarian sculptor and professor of architecture Ernő Rubik.
In a classic Rubik’s Cube, each of the six faces is covered by nine stickers. Each sticker is of one of six solid colours: white, red, blue, orange, green, or yellow. In currently sold models, white is opposite yellow, blue is opposite green, orange is opposite red, and some might replace blue with black or purple. The goal of the puzzle is to make all 6 faces have the same color.
Types of Cubes
The standard Rubik’s Cube is 3x3x3 (3 blocks across, 3 blocks down, and 3 blocks deep). Cubes can be made in 2x2, 4x4, or larger versions. 2026 the largest cube is 49 x 49, which is also 3D printed.
Another type of Rubik’s Cube is shaped like a cuboid: a cube with uneven sides. These come in sizes including 3x2x2, 3x5, and 4x3. Some cuboids can shapeshift or jumble. That means the cube goes out of its original shape. To solve a shapeshifting cube it must return to the original shape before it is considered solved.
Other versions include the Megaminx, Pyraminx, Rubik’s clock, Mirror Cube, and Square 1.
Structure
A Rubik’s Cube is a cube split into a number of smaller cubes with different colored faces attached to a rotating piece of metal in the middle. In total, there are 26 small cubes. The Rubik’s Cube has six sides with 9 little cubes attached to each side. Each side is one of six colors. Red, yellow, blue, orange, white and green are the most common colors.
The cubes can be rotated and twisted along rows and faces. The aim of the puzzle is to make each face of the cube have the same color.
Methods
Solving a Rubik’s Cube requires logic and thinking. There are many methods of solving the puzzle.
The simplest one is known as the Beginner’s Method. In this method, first the white cross is solved. Then the white layer is solved, followed by the middle layer. Finally, the yellow cross is solved, then the yellow corners.
Today the most commonmethod is called CFOP, also called the Fridrich Method, named after the popularized Jessica Fridrich. It starts with the white cross, then F2L (First 2 Layers), followed by OLL (Orientation of the Last Layer), and PLL (Permutation of the Last Layer). Other methods also include Petrus, ZZ, Roux, and others.
Records
The world record for fastest single solve was set on February 7th 2026, by a Polish speedcuber called Teodor Zajder. The new record is 2.76 seconds. The fastest average time is 3.84 seconds, set on January 10th by Xuanyi Geng (耿暄一).
According to Guinness World Records, the fastest time a robot has solved a Rubik’s Cube is 0.637 seconds. This was done by the robot “Sub1 Reloaded”, created by Albert Beer. However, a faster time of 0.38 seconds was claimed by a robot built at the Massachusetts Institute of Technology.
Written for younger readers
Rubik's Cube, in simpler words
This version comes from Wikijunior, a set of books written for children aged 8 to 11. It is shorter and uses plainer language than the article above.
From Wikijunior: How Things Are Made
Rubiks Cube two turns cubemeister com.jpg|A Rubikj’s cube Rubik’s cube is a toy puzzle designed by Erno Rubik during the mid-1970s. It is a cube-shaped device made up of smaller cube pieces with six faces having differing colors.
The individual pieces that make up the Rubik’s cube are typically produced from plastic. Most of the plastics used in a Rubik’s cube are thermoplastics. These compounds are rigid, durable, and can be permanently molded into various shapes. The plastics used in the Rubik’s cube are acrylonitrile butadiene styrene (ABS) and nylon.
Step 1: The plastic pellets are transformed into Rubik’s cube parts through injection molding. In this process, the pellets are put into the hopper of an injection molding machine. They are melted when they are passed through a hydraulically controlled screw. As the screw turns, the melted plastic is shuttled through a nozzle and physically forced, or injected, into the mold. Just prior to the arrival of the molten plastic, the two halves of the mold are brought together to create a cavity that has the identical shape of the Rubik’s cube. Inside the cavity, the plastic is held under pressure for a specific amount of time and then allowed to cool. While cooling, the plastic hardens inside the mold. After enough time passes, the mold halves are opened and the cube pieces are ejected. The mold then closes again and the process begins again.
Step 2: The Rubik’s cube parts are taken to an assembly line. The individual cube pieces are put together. Starting with the nylon core, each ABS center cube is connected to the core.
Step 3: After assembly is completed, the cubes are put in their final packaging. This can be a small box that has an instruction booklet (as shown). The package serves the dual purpose of protecting the Rubik’s cube from damage caused by shipping and advertising the product. File:Hydraulic injection molding machine.gif|Step 1: Injection moulding process to produce the Rubik’s cube part File:Pengeluaran produksi Rubik Kiub.png|alt=Step|Step 2: Line Assembly operator assemble the Rubik’s cube File:Magic cube original pack.jpg|Step 3: Rubik’s Cube are packaged
Where this page comes from
The article above is adapted from “Rubik's Cube” on Simple English Wikipedia, by its contributors. We removed reference markers, navigation boxes and tables, expanded measurement templates into readable numbers, and kept the prose otherwise intact. The simpler version is adapted from Wikijunior on Wikibooks.
Both sources are published under CC BY-SA 4.0, so this page is published under the same licence. You may share and adapt it, including commercially, as long as you credit the original and keep the same licence.
Worksheets, answer keys and printable layouts elsewhere on K5Print are our own work and are not covered by this licence.